File 介绍 File:文件和目录(文件夹)路径名的抽象表示形式
IO流操作中大部分都是对文件的操作,所以Java就提供了File类供我们来操作文件
构造方法 1 2 3 public File (String pathname) :通过将给定路径名字符串转换为抽象路径名来创建一个新 File 实例。 public File (String parent, String child) :根据 parent 路径名字符串和 child 路径名字符串创建一个新 File 实例。 public File (File parent, String child) :根据 parent 抽象路径名和 child 路径名字符串创建一个新 File 实例。
1 2 3 4 5 6 7 8 9 10 11 12 13 14 15 16 17 18 19 public class FileDemo { public static void main (String[] args) { File file = new File ("G:\\demo\\a.txt" ); System.out.println(file); File file2 = new File ("G:\\demo" , "a.txt" ); System.out.println(file2); File file3 = new File ("G:\\demo" ); File file4 = new File (file3, "a.txt" ); System.out.println(file4); } }
File类功能 更多功能详见 API。
1 2 3 4 5 6 7 8 9 10 11 12 13 14 15 16 17 18 19 20 21 22 23 24 25 26 27 28 29 30 31 32 33 34 35 A:创建功能: public boolean createNewFile () throws IOException public boolean mkdir () public boolean mkdirs () B:删除功能: public boolean delete () :删除此抽象路径名表示的文件或目录。 C:重命名功能 public boolean renameTo (File dest) D:判断功能 public boolean isDirectory () :测试此抽象路径名表示的文件是否是一个目录。 public boolean isFile () :测试此抽象路径名表示的文件是否是一个标准文件。 public boolean exists () :测试此抽象路径名表示的文件或目录是否存在。 public boolean canRead () :测试应用程序是否可以读取此抽象路径名表示的文件。 是否可读 public boolean canWrite () :测试应用程序是否可以修改此抽象路径名表示的文件。 是否可写 public boolean isHidden () :测试此抽象路径名指定的文件是否是一个隐藏文件。 E:获取功能 public File getAbsoluteFile () :返回此抽象路径名的绝对路径名形式。 public String getAbsolutePath () :返回此抽象路径名的绝对路径名字符串。 public String getPath () :将此抽象路径名转换为一个路径名字符串。获取相对路径。 public String getName () :返回由此抽象路径名表示的文件或目录的名称。 public long length () :返回由此抽象路径名表示的文件的长度(字节数)。如果此路径名表示一个目录,则返回值是不确定的。 public long lastModified () :返回此抽象路径名表示的文件最后一次被修改的时间(毫秒值)。 F:高级获取功能 public String[] list():返回一个字符串数组,这些字符串指定此抽象路径名表示的目录中的文件和目录。 获取指定目录下的所有文件或者文件夹的名称数组 public File[] listFiles():返回一个抽象路径名数组,这些路径名表示此抽象路径名表示的目录中的文件。 获取指定目录下的所有文件或者文件夹的File数组 G:过滤器功能 public String[] list(FilenameFilter filter):返回一个字符串数组,这些字符串指定此抽象路径名表示的目录中满足指定过滤器的文件和目录。 public File[] listFiles(FilenameFilter filter):返回抽象路径名数组,这些路径名表示此抽象路径名表示的目录中满足指定过滤器的文件和目录。 public File[] listFiles(FileFilter filter):返回抽象路径名数组,这些路径名表示此抽象路径名表示的目录中满足指定过滤器的文件和目录。
1 2 3 4 5 6 7 8 9 10 11 12 13 14 15 16 17 18 19 20 21 22 23 24 25 26 27 28 29 30 31 32 33 34 35 36 37 public class FileDemo { public static void main (String[] args) throws IOException { File file = new File ("G:\\demo" ); System.out.println("mkdir:" + file.mkdir()); File file2 = new File ("G:\\demo\\a.txt" ); System.out.println("createNewFile:" + file2.createNewFile()); } }
1 2 3 4 5 6 7 8 9 10 11 12 13 14 15 16 17 18 19 20 21 22 23 24 25 26 27 28 29 30 31 public class FileDemo { public static void main (String[] args) throws IOException { File file = new File ("a.txt" ); System.out.println("createNewFile:" + file.createNewFile()); System.out.println("delete:" + file.delete()); File file2 = new File ("aaa\\bbb\\ccc" ); System.out.println("mkdirs:" + file2.mkdirs()); File file7 = new File ("aaa" ); System.out.println("delete:" + file7.delete()); } }
1 2 3 4 5 6 7 8 9 10 11 12 13 14 15 16 17 18 19 20 21 22 public class FileDemo { public static void main (String[] args) throws IOException { File file2 = new File ("东方不败.jpg" ); File newFile2 = new File ("G:\\林青霞.jpg" ); System.out.println("renameTo:" + file2.renameTo(newFile2)); } }
1 2 3 4 5 6 7 8 9 10 11 12 13 14 15 16 17 public class FileDemo { public static void main (String[] args) throws IOException { File file = new File ("a.txt" ); System.out.println(file.createNewFile()); System.out.println("isDirectory:" + file.isDirectory()); System.out.println("isFile:" + file.isFile()); System.out.println("exists:" + file.exists()); System.out.println("canRead:" + file.canRead()); System.out.println("canWrite:" + file.canWrite()); System.out.println("isHidden:" + file.isHidden()); } }
1 2 3 4 5 6 7 8 9 10 11 12 13 14 15 16 17 18 19 20 21 22 public class FileDemo { public static void main (String[] args) throws IOException { File file = new File ("test.txt" ); file.createNewFile(); System.out.println("getAbsolutePath:" + file.getAbsolutePath()); System.out.println("getPath:" + file.getPath()); System.out.println("getName:" + file.getName()); System.out.println("length:" + file.length()); System.out.println("lastModified:" + file.lastModified()); Date d = new Date (1491468425566L ); SimpleDateFormat sdf = new SimpleDateFormat ("yyyy-MM-dd HH:mm:ss" ); String s = sdf.format(d); System.out.println(s); } }
1 2 3 4 5 6 7 8 9 10 11 12 13 14 15 16 17 18 19 20 21 22 public class FileDemo { public static void main (String[] args) { File file = new File ("G:\\" ); String[] strArray = file.list(); for (String s : strArray) { System.out.println(s); } System.out.println("------------" ); File[] fileArray = file.listFiles(); for (File f : fileArray) { System.out.println(f.getName()); } } }
案例 A:输出指定目录下指定后缀名的文件名称
a:先获取所有的,在遍历的时候判断,再输出
b:先判断,再获取,最后直接遍历输出即可
B:批量修改文件名称
案例A
1 2 3 4 5 6 7 8 9 10 11 12 13 14 15 16 17 18 19 20 21 22 23 24 25 26 27 28 29 30 31 32 33 34 public class FileDemo { public static void main (String[] args) { File file = new File ("e:\\" ); File[] fileArray = file.listFiles(); for (File f : fileArray) { if (f.isFile()) { if (f.getName().endsWith(".jpg" )) { System.out.println(f.getName()); } } } } }
1 2 3 4 5 6 7 8 9 10 11 12 13 14 15 16 17 18 19 20 21 22 23 24 25 26 27 28 29 30 31 32 33 34 35 36 37 38 public class FileDemo { public static void main (String[] args) { File file = new File ("G:\\" ); String[] strArray = file.list(new FilenameFilter () { @Override public boolean accept (File dir, String name) { return new File (dir, name).isFile() && name.endsWith(".jpg" ); } }); for (String s : strArray) { System.out.println(s); } } }
案例B:
1 2 3 4 5 6 7 8 9 10 11 12 13 14 15 16 17 18 19 20 21 22 23 24 25 26 27 28 29 30 31 32 33 34 35 36 37 38 39 40 41 42 43 44 45 46 public class FileDemo { public static void main (String[] args) { File srcFolder = new File ("G:\\评书\\三国演义" ); File[] fileArray = srcFolder.listFiles(); for (File file : fileArray) { String name = file.getName(); int index = name.indexOf("_" ); String numberString = name.substring(index + 1 , index + 4 ); int endIndex = name.lastIndexOf('_' ); String nameString = name.substring(endIndex); String newName = numberString.concat(nameString); File newFile = new File (srcFolder, newName); file.renameTo(newFile); } } }
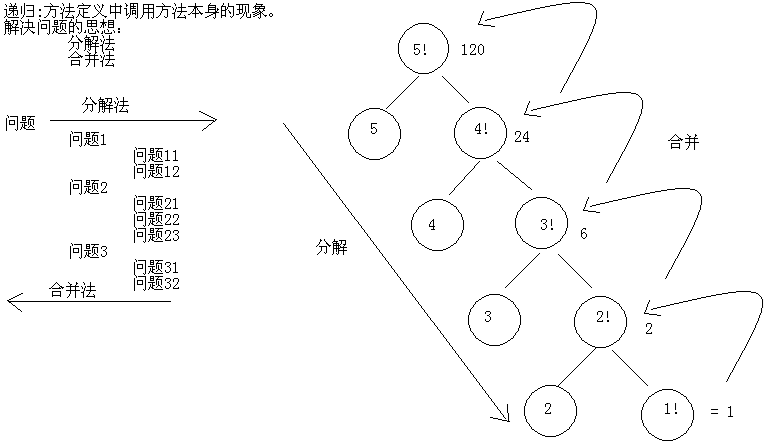
递归 方法定义中调用方法本身的现象
注意事项 A:要有出口,否则就是死递归
B:次数不能过多,否则内存溢出
C:构造方法不能递归使用
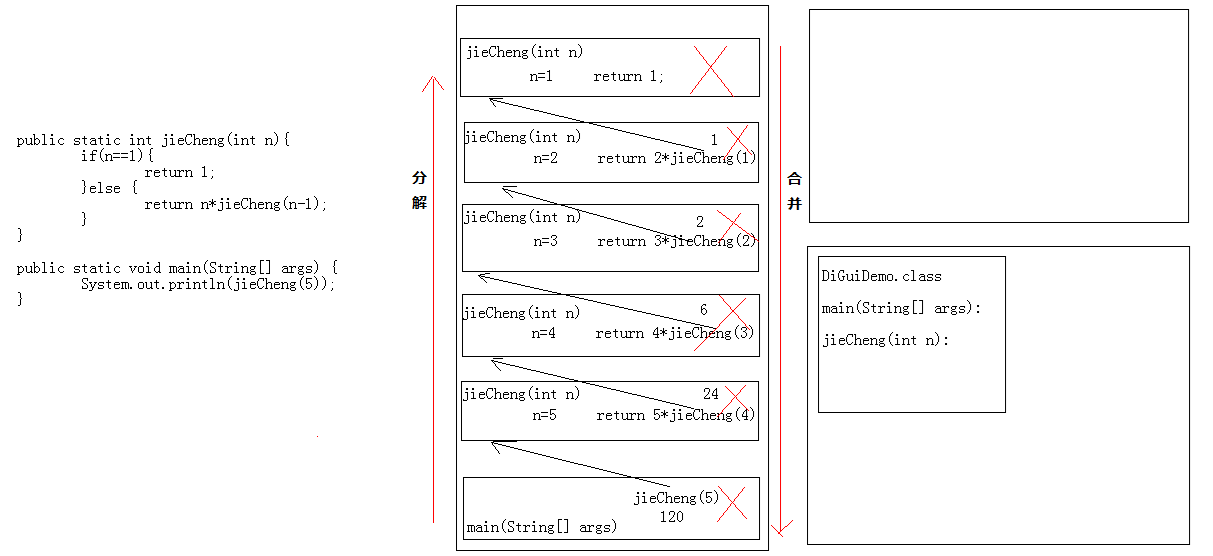
案例 A:递归求阶乘
B:兔子问题
C:递归输出指定目录下所有指定后缀名的文件绝对路径
D:递归删除带内容的目录(小心使用)
案例A:
案例B:
1 2 3 4 5 6 7 8 9 10 11 12 13 14 15 16 17 18 19 20 21 22 23 24 25 26 27 28 29 30 31 32 33 34 35 36 37 38 39 40 41 42 43 44 45 46 47 48 49 50 51 52 53 54 55 56 57 58 59 60 61 62 63 64 65 66 67 68 69 70 71 72 73 74 75 76 77 78 79 public class DiGuiDemo2 { public static void main (String[] args) { int [] arr = new int [20 ]; arr[0 ] = 1 ; arr[1 ] = 1 ; for (int x = 2 ; x < arr.length; x++) { arr[x] = arr[x - 2 ] + arr[x - 1 ]; } System.out.println(arr[19 ]); int a = 1 ; int b = 1 ; for (int x = 0 ; x < 18 ; x++) { int temp = a; a = b; b = temp + b; } System.out.println(b); System.out.println(fib(20 , 1 )); } public static int fib (int mouth, int num) { if (mouth == 1 || mouth == 2 ) { return num; } else { return fib(mouth - 1 , num) + fib(mouth - 2 , num); } } }
案例C:
1 2 3 4 5 6 7 8 9 10 11 12 13 14 15 16 17 18 19 20 21 22 23 24 25 26 27 28 29 30 31 32 33 34 35 36 37 38 39 40 41 public class FilePathDemo { public static void main (String[] args) { File srcFolder = new File ("G:\\JavaSE" ); getAllJavaFilePaths(srcFolder); } private static void getAllJavaFilePaths (File srcFolder) { File[] fileArray = srcFolder.listFiles(); for (File file : fileArray) { if (file.isDirectory()) { getAllJavaFilePaths(file); } else { if (file.getName().endsWith(".java" )) { System.out.println(file.getAbsolutePath()); } } } } }
案例D:
1 2 3 4 5 6 7 8 9 10 11 12 13 14 15 16 17 18 19 20 21 22 23 24 25 26 27 28 29 30 31 32 33 34 35 36 37 38 39 40 41 42 public class FileDeleteDemo { public static void main (String[] args) { File srcFolder = new File ("G:\\JavaSE" ); deleteFolder(srcFolder); } private static void deleteFolder (File srcFolder) { File[] fileArray = srcFolder.listFiles(); if (fileArray != null ) { for (File file : fileArray) { if (file.isDirectory()) { deleteFolder(file); } else { System.out.println(file.getName() + "---" + file.delete()); } } System.out.println(srcFolder.getName() + "---" + srcFolder.delete()); } else { System.out.println("该目录不存在!" ); } } }
流 作用 IO流用来处理设备之间的数据传输(上传文件和下载文件)。
Java对数据的操作的通过流的方式。
Java用于操作流的对象都在IO包中。
流的分类 一般我们在讨论IO流的时候,如果没有明确说明按照什么分,默认按照数据类型 分。
A:数据流向(方向)
输入流 读 取数据
输出流 写 出数据
B:数据类型(单位)
字节流 (操作二进制文件,用Windows记事本打开读不懂的文件,英文 也可以用字节流)
字节输入流 InputStream
|– FileInputStream
|– BufferedInputStream
字节输出流 OutputStream
|– FileOutputStream
|– BufferedOutputStream
字符流 (操作文本文件,用Windows记事本打开能读懂的文件,包括中文、英文 等各国语言)
字符输入流 Reader
|– InputStreamReader
|– FileReader
|– BufferedReader
字符输出流 Writer
|– OutputStreamWriter
|– FileWriter
|– BufferedWriter
C:功能
节点流,管道流(处理流)
输入流与输出流的区别 1).无论文件是否存在,输出流会自动创建文件 。而输入流不会自动创建文件。
2).输出流有flush()方法 ,输入流没有此方法。
图解
字节流 FileOutputStream 构造方法 没有无参构造,必须要知道往哪里写
1 2 3 4 5 6 public FileOutputStream (File file) :创建一个向指定 File 对象表示的文件中写入数据的文件输出流。参数:file - 为了进行写入而打开的文件。、public FileOutputStream (String name) :创建一个向具有指定名称的文件中写入数据的输出文件流。参数:name - 与系统有关的文件名 。public FileOutputStream (File file, boolean append) :创建一个向指定 File 对象表示的文件中写入数据的文件输出流。 如果第二个参数为 true ,则将字节写入文件末尾处,而不是写入文件开始处。 public FileOutputStream (String name, boolean append) :创建一个向具有指定 name 的文件中写入数据的输出文件流。 如果第二个参数为 true ,则将字节写入文件末尾处,而不是写入文件开始处。
成员方法 1 2 3 4 public void write (int b) : 将指定字节写入此文件输出流。参数:b - 要写入的字节。public void write (byte [] b) : 将 b.length 个字节从指定 byte 数组写入此文件输出流中。public void write (byte [] b,int off,int len) : 将指定 byte 数组中从偏移量 off 开始的 len 个字节写入此文件输出流。public void close () :关闭此文件输出流并释放与此流有关的所有系统资源。此文件输出流不能再用于写入字节。如果此流有一个与之关联的通道,则关闭该通道。
操作步骤 1:创建字节输出流对象
2:写数据,调用write()方法
3:释放资源
1 2 3 4 5 6 7 8 9 10 11 12 13 14 15 16 17 18 19 20 21 22 23 24 25 26 27 28 29 30 31 32 33 34 35 36 37 38 39 40 41 42 43 44 45 46 47 48 49 50 51 52 53 54 55 56 57 58 public class FileOutputStreamDemo { public static void main (String[] args) throws IOException { FileOutputStream fos = new FileOutputStream ("fos.txt" ); FileOutputStream fos2 = new FileOutputStream ("fos.txt" , true ); fos.write("hello,IO" .getBytes()); fos.write(97 ); fos.write(57 ); fos.write(55 ); byte [] bys={97 ,98 ,99 ,100 ,101 }; fos.write(bys); fos.write(bys,1 ,3 ); for (int x = 0 ; x < 10 ; x++) { fos.write(("hello" + x).getBytes()); fos.write("\r\n" .getBytes()); } fos.close(); fos.write("java" .getBytes()); } }
1 2 3 4 5 6 7 8 9 10 11 12 13 14 15 16 17 18 19 20 21 22 23 24 25 26 public class FileOutputStreamDemo4 { public static void main (String[] args) { FileOutputStream fos = null ; try { fos = new FileOutputStream ("z:\\fos.txt" ); fos.write("java" .getBytes()); } catch (FileNotFoundException e) { e.printStackTrace(); } catch (IOException e) { e.printStackTrace(); } finally { try { fos.close(); } catch (IOException e) { e.printStackTrace(); } } } }
构造方法 没有无参构造,必须要知道从哪里写
1 2 3 4 public FileInputStream (File file) :通过打开一个到实际文件的连接来创建一个 FileInputStream,该文件通过文件系统中的 File 对象 file 指定。 参数: file - 为了进行读取而打开的文件。 public FileInputStream (String name) :通过打开一个到实际文件的连接来创建一个 FileInputStream,该文件通过文件系统中的路径名 name 指定。 参数: name - 与系统有关的文件名。
成员方法 1 2 3 4 5 6 7 8 9 public int read () :一次读一个字节,换行符号也能读到。读完后指针将指向下一个字节,有点类似迭代器的next()方法。 从此输入流中读取一个数据字节。如果没有输入可用,则此方法将阻塞。 返回:下一个数据字节;如果已到达文件末尾,则返回 -1 。 public int read (byte [] b) :一次读一个字节数组。 从此输入流中将最多 b.length 个字节的数据读入一个 byte 数组中。在某些输入可用之前,此方法将阻塞。 返回:读入缓冲区的字节总数,如果因为已经到达文件末尾而没有更多的数据,则返回 -1 。 public int read (byte [] b, int off, int len) :从此输入流中将最多 len 个字节的数据读入一个 byte 数组中。 如果 len 不为 0 ,则在输入可用之前,该方法将阻塞;否则,不读取任何字节并返回 0 。 返回: 读入缓冲区的字节总数,如果因为已经到达文件末尾而没有更多的数据,则返回 -1 。
操作步骤 1:创建字节输入流对象
2:读数据,调用read()方法,并把数据显示到控制台
3:释放资源
1 2 3 4 5 6 7 8 9 10 11 12 13 14 15 16 17 18 19 20 21 22 23 24 25 26 public class FileInputStreamDemo { public static void main (String[] args) throws IOException { FileInputStream fis = new FileInputStream ("fis.txt" ); int by = 0 ; while ((by = fis.read()) != -1 ) { System.out.print((char ) by); } byte [] bys = new byte [1024 ]; int len = 0 ; while ((len = fis.read(bys)) != -1 ) { System.out.print(new String (bys, 0 , len)); } fis.close(); } }
案例 使用2种方式实现
A:复制文本文件
B:复制图片
C:复制视频
1 2 3 4 5 6 7 8 9 10 11 12 13 14 15 16 17 18 public class CopyFileDemo { public static void main (String[] args) throws IOException { FileInputStream fis = new FileInputStream ("a.txt" ); FileOutputStream fos = new FileOutputStream ("b.txt" ); int by = 0 ; while ((by = fis.read()) != -1 ) { fos.write(by); } fos.close(); fis.close(); } }
这一次复制中文确没有乱码,为什么?
上一次我们出现问题的原因在于我们每次获取到一个字节数据,就把该字节数据转换为了字符数据,然后输出到控制台。而现在,通过IO流读取数据,写到文本文件,你读取一个字节,我就写入一个字节,你没有做任何的转换。它会自己做转换,两个字节拼接成一个字符。看下面代码。
1 2 3 4 5 6 7 8 9 10 11 12 13 14 15 16 17 18 19 20 21 22 23 24 25 26 27 28 public class StringDemo { public static void main (String[] args) { String s1 = "abcde" ; byte [] by1 = s1.getBytes(); System.out.println(Arrays.toString(by1)); String s2 = "我爱你中国" ; byte [] by2; try { by2 = s2.getBytes("GBK" ); System.out.println(Arrays.toString(by2)); } catch (UnsupportedEncodingException e) { e.printStackTrace(); } char [] ch = s2.toCharArray(); System.out.println(ch); } }
1 2 3 4 5 6 7 8 9 10 11 12 13 14 15 16 17 18 19 public class CopyFileDemo { public static void main (String[] args) throws IOException { FileInputStream fis = new FileInputStream ("a.txt" ); FileOutputStream fos = new FileOutputStream ("b.txt" ); byte [] bys = new byte [1024 ]; int len = 0 ; while ((len = fis.read(bys)) != -1 ) { fos.write(bys, 0 , len); } fos.close(); fis.close(); } }
案例B:复制图片,只能用字节流
1 2 3 4 5 6 7 8 9 10 11 12 13 14 15 16 17 18 19 public class CopyImageDemo { public static void main (String[] args) throws IOException { FileInputStream fis = new FileInputStream ("a.jpg" ); FileOutputStream fos = new FileOutputStream ("b.jpg" ); int by = 0 ; while ((by = fis.read()) != -1 ) { fos.write(by); } fos.close(); fis.close(); } }
1 2 3 4 5 6 7 8 9 10 11 12 13 14 15 16 17 18 19 public class CopyFileDemo { public static void main (String[] args) throws IOException { FileInputStream fis = new FileInputStream ("a.jpg" ); FileOutputStream fos = new FileOutputStream ("b.jpg" ); byte [] bys = new byte [1024 ]; int len = 0 ; while ((len = fis.read(bys)) != -1 ) { fos.write(bys, 0 , len); } fos.close(); fis.close(); } }
案例C:复制视频
1 2 3 4 5 6 7 8 9 10 11 12 13 14 15 16 17 18 19 public class CopyMVDemo { public static void main (String[] args) throws IOException { FileInputStream fis = new FileInputStream ("a.avi" ); FileOutputStream fos = new FileOutputStream ("b.avi" ); int by = 0 ; while ((by = fis.read()) != -1 ) { fos.write(by); } fos.close(); fis.close(); } }
1 2 3 4 5 6 7 8 9 10 11 12 13 14 15 16 17 18 19 20 public class CopyMp4Demo { public static void main (String[] args) throws IOException { FileInputStream fis = new FileInputStream ("a.avi" ); FileOutputStream fos = new FileOutputStream ("b.avi" ); byte [] bys = new byte [1024 ]; int len = 0 ; while ((len = fis.read(bys)) != -1 ) { fos.write(bys, 0 , len); } fos.close(); fis.close(); } }
字节缓冲区流 字节流一次读写一个数组的速度明显比一次读写一个字节的速度快很多,这是加入了数组这样的缓冲区效果,java本身在设计的时候,也考虑到了这样的设计思想(装饰设计模式),所以提供了字节缓冲区流(带缓冲区的字节类)这种类被称为:缓冲区类(高效类)
构造方法可以指定缓冲区的大小,但是我们一般用不上,因为默认缓冲区大小就足够了。
为什么不传递一个具体的文件或者文件路径,而是传递一个OutputStream对象呢?
原因很简单,字节缓冲区流仅仅提供缓冲区,为高效而设计的。但是呢,真正的读写操作还得靠基本的流对象实现。
A:BufferedOutputStream字节缓冲输出流 ,写入数据。该类实现缓冲的输出流。通过设置这种输出流,应用程序就可以将各个字节写入底层输出流中,而不必针对每次字节写入调用底层系统。
构造方法:
public BufferedOutputStream(OutputStream out):创建一个新的缓冲输出流,以将数据写入指定的底层输出流。
public BufferedOutputStream(OutputStream out, int size):创建一个新的缓冲输出流,以将具有指定缓冲区大小的数据写入指定的底层输出流。
B:BufferedInputStream字节缓冲输入流 ,读取数据。在创建 BufferedInputStream 时,会创建一个内部缓冲区数组。(看API)
构造方法:
public BufferedInputStream(InputStream in):创建一个 BufferedInputStream 并保存其参数,即输入流 in,以便将来使用。创建一个内部缓冲区数组并将其存储在 buf 中。
public BufferedInputStream(InputStream in, int size):创建具有指定缓冲区大小的 BufferedInputStream 并保存其参数,即输入流 in,以便将来使用。
创建一个长度为 size 的内部缓冲区数组并将其存储在 buf 中。
1 2 3 4 5 6 7 8 9 10 11 12 13 14 public class BufferedOutputStreamDemo { public static void main (String[] args) throws IOException { BufferedOutputStream bos = new BufferedOutputStream (new FileOutputStream ("bos.txt" )); bos.write("hello" .getBytes()); bos.close(); } }
1 2 3 4 5 6 7 8 9 10 11 12 13 14 15 16 17 18 19 20 21 22 23 24 public class BufferedInputStreamDemo { public static void main (String[] args) throws IOException { BufferedInputStream bis = new BufferedInputStream (new FileInputStream ("bos.txt" )); byte [] bys = new byte [1024 ]; int len = 0 ; while ((len = bis.read(bys)) != -1 ) { System.out.print(new String (bys, 0 , len)); } bis.close(); } }
案例 4种实现
A:复制文本文件
B:复制图片
C:复制视频
案例C:
1 2 3 4 5 6 7 8 9 10 11 12 13 14 15 16 17 18 19 20 21 22 23 24 25 26 27 28 29 30 31 32 33 34 35 36 37 38 39 40 41 42 43 44 45 46 47 48 49 50 51 52 53 54 55 56 57 58 59 60 61 62 63 64 65 66 67 68 69 70 71 72 73 74 75 public class CopyAVIDemo { public static void main (String[] args) throws IOException { long start = System.currentTimeMillis(); method4("G:\\a.avi" , "G:\\b.avi" ); long end = System.currentTimeMillis(); System.out.println("共耗时" + (end - start) + "毫秒" ); } public static void method4 (String string, String string2) throws IOException { BufferedInputStream bis = new BufferedInputStream (new FileInputStream (string)); BufferedOutputStream bos = new BufferedOutputStream (new FileOutputStream (string2, true )); byte [] bys = new byte [1024 ]; int len = 0 ; while ((len = bis.read(bys)) != -1 ) { bos.write(bys, 0 , len); } bos.close(); bis.close(); } public static void method3 (String string, String string2) throws IOException { BufferedInputStream bis = new BufferedInputStream (new FileInputStream (string)); BufferedOutputStream bos = new BufferedOutputStream (new FileOutputStream (string2)); int by = 0 ; while ((by = bis.read()) != -1 ) { bos.write(by); } bos.close(); bis.close(); } public static void method2 (String string, String string2) throws IOException { FileInputStream fis = new FileInputStream (string); FileOutputStream fos = new FileOutputStream (string2); byte [] bys = new byte [1024 ]; int len = 0 ; while ((len = fis.read(bys)) != -1 ) { fos.write(bys, 0 , len); } fos.close(); fis.close(); } public static void method1 (String string, String string2) throws IOException { FileInputStream fis = new FileInputStream (string); FileOutputStream fos = new FileOutputStream (string2); int by = 0 ; while ((by = fis.read()) != -1 ) { fos.write(by); } fos.close(); fis.close(); } }
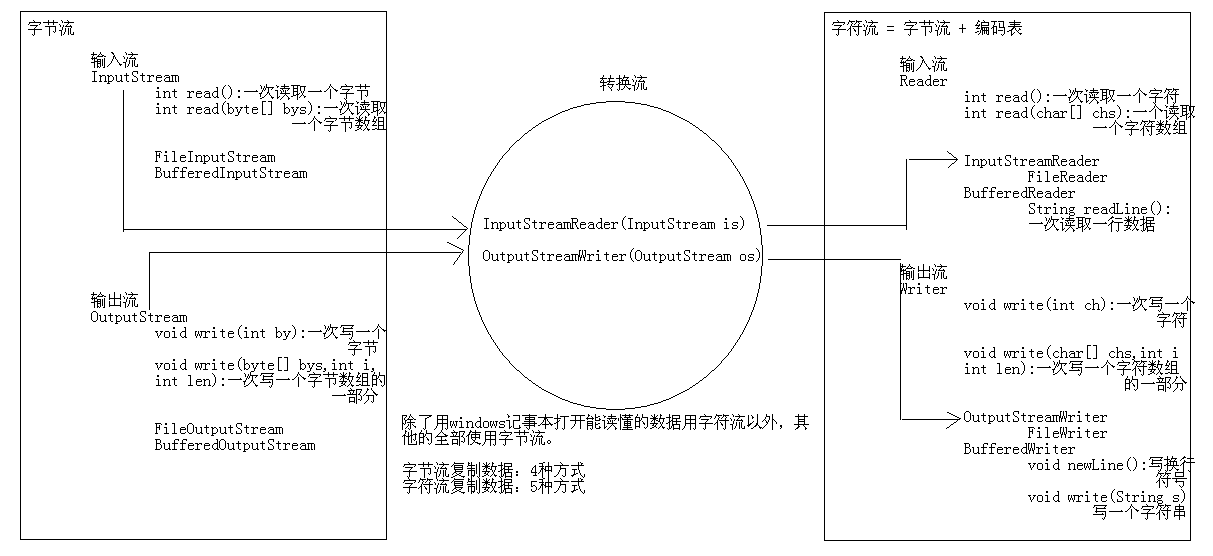
字符流 介绍 字节流操作中文数据不是特别的方便,所以就出现了转换流 。转换流的作用就是把字节流转换字符流来使用。
转换流其实是一个字符流。
字符流 = 字节流 + 编码表
编码表 就是由字符 和对应的数值 组成的一张表。
1、计算机只能识别二进制数据,早期由来是电信号。为了方便应用计算机,让它可以识别各个国家的文字,就将各个国家的文字用数字来表示,并一 一对应,形成一张表。
ASCII :美国标准信息交换码。用一个字节的7位可以表示。
ISO-8859-1:拉丁码表,欧洲码表。用一个字节的8位表示。
GB2312 :中国的中文编码表。
GBK :中国的中文编码表升级,融合了更多的中文文字符号。
GB18030 :GBK的取代版本
BIG-5码 :通行于台湾、香港地区的一个繁体字编码 方案,俗称”大五码”。地区标准号为:CNS11643,这就是人们讲的BIG-5 码 。
Unicode :国际标准码,融合了多种文字。所有文字都用两个字节来表示,Java语言使用的就是unicode
UTF-8 :最多用三个字节来表示一个字符。
UTF-8不同,它定义了一种”区间规则”,这种规则可以和ASCII编码保持最大程度的兼容:
它将Unicode编码为00000000-0000007F的字符,用单个字节来表示
它将Unicode编码为00000080-000007FF的字符用两个字节表示
它将Unicode编码为00000800-0000FFFF的字符用3字节表示
2、字符串中 的编码问题
编码:把能看懂的变成看不懂的
String – byte[]:使用String的构造方法
public byte[] getBytes(Charset charset):使用给定的 charset (字符集)将此 String 编码到 byte 序列,并将结果存储到新的 byte 数组。
解码:把看不懂的变成能看懂的
byte[] – String:使用String的成员方法
public String(byte[] bytes, String charsetName):通过使用指定的 charset (字符集)解码指定的 byte 数组,构造一个新的 String。
1 2 3 4 5 6 7 8 9 10 11 12 13 14 15 16 17 18 19 20 21 22 23 24 25 26 public class StringDemo { public static void main (String[] args) throws UnsupportedEncodingException { String s = "你好" ; byte [] bys1 = s.getBytes(); byte [] bys2 = s.getBytes("GBK" ); byte [] bys3 = s.getBytes("UTF-8" ); System.out.println(Arrays.toString(bys1)); System.out.println(Arrays.toString(bys2)); System.out.println(Arrays.toString(bys3)); String ss1 = new String (bys1); String ss2 = new String (bys2, "GBK" ); String ss3 = new String (bys1, "UTF-8" ); System.out.println(ss1); System.out.println(ss2); System.out.println(ss3); } }
IO流中的编码问题 编码问题其实很简单,编码只要一致即可
1 2 3 4 5 6 7 8 9 10 11 12 13 14 15 16 17 18 19 20 21 22 23 24 25 26 27 28 29 public class OutputStreamWriterDemo { public static void main (String[] args) throws IOException { OutputStreamWriter osw1 = new OutputStreamWriter (new FileOutputStream ("osw.txt" )); OutputStreamWriter osw2 = new OutputStreamWriter (new FileOutputStream ("osw.txt" ), "GBK" ); OutputStreamWriter osw3 = new OutputStreamWriter (new FileOutputStream ("osw.txt" ), "UTF-8" ); InputStreamReader isr1 = new InputStreamReader (new FileInputStream ("osw.txt" )); InputStreamReader isr2 = new InputStreamReader (new FileInputStream ("osw.txt" ), "GBK" ); InputStreamReader isr3 = new InputStreamReader (new FileInputStream ("osw.txt" ), "UTF-8" ); osw2.write("中国" ); osw1.close(); osw2.close(); osw3.close(); int ch = 0 ; while ((ch = isr3.read()) != -1 ) { System.out.println(ch); } isr1.close(); isr2.close(); isr3.close(); } }
OutputStreamWriter 字符流通向字节流的桥梁。按指定字符集写入字符
构造方法:
public OutputStreamWriter(OutputStream out):创建使用默认字符编码的 OutputStreamWriter。
public OutputStreamWriter(OutputStream out, String charsetName):创建使用指定字符集的 OutputStreamWriter。指定编码。
成员方法:
public void write(int c):写入单个字符 。
public void write(char[] cbuf):写入字符数组。是父类中的方法
public void write(char[] cbuf, int off, int len):写入字符数组的某一部分。
public void write(String str):写入字符串。是父类中的方法
public void write(String str, int off, int len):写入字符串的某一部分。
1 2 3 4 5 6 7 8 9 10 11 12 13 14 15 16 17 18 19 20 21 22 23 24 25 26 27 28 29 30 31 public class OutputStreamWriterDemo { public static void main (String[] args) throws IOException { OutputStreamWriter osw = new OutputStreamWriter (new FileOutputStream ("osw.txt" , true )); osw.write('a' ); osw.write(97 ); char [] chs = { 'a' , 'b' , 'c' , 'd' , 'e' }; osw.write(chs); osw.write(chs, 1 , 3 ); osw.write("我爱林青霞\r\n" ); osw.write("我爱林青霞" , 2 , 3 ); osw.flush(); osw.write("我爱林青霞" , 2 , 3 ); osw.close(); } }
字节流通向字符流的桥梁。按照指定字符集读取字符
构造方法:
public InputStreamReader(InputStream in):创建一个使用默认字符集的 InputStreamReader。
public InputStreamReader(InputStream in, String charsetName):创建使用指定字符集的 InputStreamReader。
成员方法:
public int read():读取单个字符 。返回:读取的字符 ,如果已到达流的末尾,则返回 -1 。一次读取一个字符
public int read(char[] cbuf):将字符读入数组。返回:读取的字符数 ,如果已到达流的末尾,则返回 -1。是父类中的方法 。一次读取一个字符数组
public int read(char[] cbuf, int offset, int length):将字符读入数组中的某一部分。返回:读取的字符数,如果已到达流的末尾,则返回 -1 。
1 2 3 4 5 6 7 8 9 10 11 12 13 14 15 16 17 18 19 20 21 22 public class InputStreamReaderDemo { public static void main (String[] args) throws IOException { InputStreamReader isr = new InputStreamReader (new FileInputStream ("osw.txt" )); char [] chs = new char [1024 ]; int len = 0 ; while ((len = isr.read(chs)) != -1 ) { System.out.print(new String (chs, 0 , len)); } isr.close(); } }
FileWriter和FileReader 1 2 3 4 5 6 7 8 9 10 11 12 13 14 15 16 17 18 19 20 21 22 23 24 25 26 27 28 29 30 31 32 33 34 35 public class CopyFileDemo { public static void main (String[] args) throws IOException { FileReader fr = new FileReader ("a.txt" ); FileWriter fw = new FileWriter ("b.txt" ); char [] chs = new char [1024 ]; int len = 0 ; while ((len = fr.read(chs)) != -1 ) { fw.write(chs, 0 , len); fw.flush(); } fw.close(); fr.close(); } }
字符缓冲流 A: BufferedWriter:字符缓冲输出流 。将文本写入字符输出流,缓冲各个字符,从而提供单个字符、数组和字符串的高效写入。 可以指定缓冲区的大小,或者接受默认的大小。在大多数情况下,默认值就足够大了。
构造方法:
public BufferedWriter(Writer out):创建一个使用默认大小输出缓冲区的缓冲字符输出流。
public BufferedWriter(Writer out, int sz):创建一个使用给定大小输出缓冲区的新缓冲字符输出流。
特殊方法:
public void newLine():写入一个行分隔符 。行分隔符字符串由系统属性 line.separator 定义 ,并且不一定是单个新行 (‘\n’) 符。
B: BufferedReader:字符缓冲输入流 。从字符输入流中读取文本,缓冲各个字符,从而实现字符、数组和行的高效读取。可以指定缓冲区的大小,或者可使用默认的大小。大多数情况下,默认值就足够大了。
构造方法:
public BufferedReader(Reader in):创建一个使用默认大小输入缓冲区的缓冲字符输入流。
public BufferedReader(Reader in, int sz):创建一个使用指定大小输入缓冲区的缓冲字符输入流。
特殊方法:
public String readLine():读取一个文本行 。通过下列字符之一即可认为某行已终止:换行 (‘\n’)、回车 (‘\r’) 或回车后直接跟着换行。
返回:包含该行内容的字符串,不包含任何行终止符 ,如果已到达流末尾,则返回 null。
1 2 3 4 5 6 7 8 9 10 11 12 13 14 public class BufferedWriterDemo { public static void main (String[] args) throws IOException { BufferedWriter bw = new BufferedWriter (new FileWriter ("bw.txt" )); bw.write("hello" ); bw.write("world" ); bw.write("java" ); bw.flush(); bw.close(); } }
1 2 3 4 5 6 7 8 9 10 11 12 13 14 15 16 17 18 19 20 21 22 23 public class BufferedReaderDemo { public static void main (String[] args) throws IOException { BufferedReader br = new BufferedReader (new FileReader ("bw.txt" )); int ch = 0 ; while ((ch = br.read()) != -1 ) { System.out.print((char ) ch); } br.close(); } }
1 2 3 4 5 6 7 8 9 10 11 12 13 14 15 16 17 18 19 20 21 22 23 24 25 26 27 28 29 30 31 32 33 34 35 public class BufferedDemo { public static void main (String[] args) throws IOException { read(); } public static void read () throws IOException { BufferedReader br = new BufferedReader (new FileReader ("bw.txt" )); String line = null ; while ((line = br.readLine()) != null ) { System.out.println(line); } br.close(); } public static void write () throws IOException { BufferedWriter bw = new BufferedWriter (new FileWriter ("bw.txt" )); for (int x = 0 ; x < 10 ; x++) { bw.write("hello" + x); bw.newLine(); bw.flush(); } bw.close(); } }
1 2 3 4 5 6 7 8 9 10 11 12 13 14 15 16 17 18 19 20 21 22 23 24 25 26 27 28 29 30 31 32 33 34 35 36 37 38 39 40 41 42 43 44 45 46 47 48 49 public class CopyFileDemo { public static void main (String[] args) throws IOException { BufferedReader br = new BufferedReader (new FileReader ("a.txt" )); BufferedWriter bw = new BufferedWriter (new FileWriter ("b.txt" )); char [] chs = new char [1024 ]; int len = 0 ; while ((len = br.read(chs)) != -1 ) { bw.write(chs, 0 , len); bw.flush(); } bw.close(); br.close(); } } public class CopyFileDemo2 { public static void main (String[] args) throws IOException { BufferedReader br = new BufferedReader (new FileReader ("a.txt" )); BufferedWriter bw = new BufferedWriter (new FileWriter ("b.txt" )); String line = null ; while ((line = br.readLine()) != null ) { bw.write(line); bw.newLine(); bw.flush(); } bw.close(); br.close(); } }
案例 复制文本文件(5种方式)
数据操作流 数据操作流(操作基本类型数据的流)(理解)
一、可以操作基本类型的数据
1 2 3 4 5 6 7 8 9 10 11 12 13 14 15 16 17 18 19 20 21 22 23 24 25 26 27 28 29 30 31 32 33 34 35 36 37 38 39 40 41 42 43 44 45 46 47 48 49 50 51 52 53 54 55 56 57 58 59 60 61 62 63 public class DataStreamDemo { public static void main (String[] args) throws IOException { read(); } private static void read () throws IOException { DataInputStream dis = new DataInputStream (new FileInputStream ("dos.txt" )); byte b = dis.readByte(); short s = dis.readShort(); int i = dis.readInt(); long l = dis.readLong(); float f = dis.readFloat(); double d = dis.readDouble(); char c = dis.readChar(); boolean bb = dis.readBoolean(); dis.close(); System.out.println(b); System.out.println(s); System.out.println(i); System.out.println(l); System.out.println(f); System.out.println(d); System.out.println(c); System.out.println(bb); } private static void write () throws IOException { DataOutputStream dos = new DataOutputStream (new FileOutputStream ("dos.txt" )); dos.writeByte(10 ); dos.writeShort(100 ); dos.writeInt(1000 ); dos.writeLong(10000 ); dos.writeFloat(12.34F ); dos.writeDouble(12.56 ); dos.writeChar('a' ); dos.writeBoolean(true ); dos.close(); } }
内存操作流 内存操作流
一、有些时候我们操作完毕后,未必需要产生一个文件,就可以使用内存操作流。例如:从数据库中取出二进制的文件,会用到 ByteArrayInputStream 。
二、三种
A:ByteArrayInputStream,ByteArrayOutputStream
ByteArrayInputStream:包含一个内部缓冲区,该缓冲区包含从流中读取的字节。内部计数器跟踪 read 方法要提供的下一个字节。
关闭 ByteArrayInputStream 无效。此类中的方法在关闭此流后仍可被调用,而不会产生任何 IOException。
B:CharArrayReader,CharArrayWriter
C:StringReader,StringWriter
1 2 3 4 5 6 7 8 9 10 11 12 13 14 15 16 17 18 19 20 21 22 23 24 25 26 27 28 29 30 31 32 33 34 35 36 37 38 39 40 41 42 public class ByteArrayStreamDemo { public static void main (String[] args) throws IOException { ByteArrayOutputStream baos = new ByteArrayOutputStream (); for (int x = 0 ; x < 10 ; x++) { baos.write(("hello" + x).getBytes()); } byte [] bys = baos.toByteArray(); ByteArrayInputStream bais = new ByteArrayInputStream (bys); int by = 0 ; while ((by = bais.read()) != -1 ) { System.out.print((char ) by); } } }
打印流(掌握) 一、字节打印流,字符打印流
二、特点:
A:只操作目的地,不操作数据源
B:可以操作任意类型的数据
C:如果启用了自动刷新,在调用println()方法的时候,能够换行并刷新
D:可以直接操作文件
问题:哪些流可以直接操作文件呢?
看API,如果其构造方法能够同时接收File和String类型的参数,一般都是可以直接操作文件的
三、复制文本文件
1 2 3 4 5 6 7 8 9 10 11 12 13 14 public class PrintWriterDemo { public static void main (String args[]) throws IOException { BufferedReader br = new BufferedReader (new FileReader ("a.txt" )); PrintWriter pw = new PrintWriter (new FileWriter ("b.txt" ), true ); String line = null ; while ((line = br.readLine()) != null ) { pw.println(line); } pw.close(); br.close(); } }
1 2 3 4 5 6 7 8 9 10 11 12 13 14 15 16 17 18 19 20 21 22 23 24 25 26 27 28 29 30 31 32 33 34 35 public class PrintWriterDemo { public static void main (String[] args) throws IOException { PrintWriter pw = new PrintWriter ("test.txt" ); pw.write("hello" ); pw.write("world" ); pw.write("java" ); pw.close(); } }
1 2 3 4 5 6 7 8 9 10 11 12 13 14 15 16 17 18 19 20 21 22 23 24 25 26 27 28 29 30 31 32 33 34 public class PrintWriterDemo2 { public static void main (String[] args) throws IOException { PrintWriter pw = new PrintWriter (new FileWriter ("test.txt" ), true ); pw.println("hello" ); pw.println(true ); pw.println(100 ); pw.close(); } }
1 2 3 4 5 6 7 8 9 10 11 12 13 14 15 16 17 18 19 20 21 22 23 24 25 26 27 28 29 30 31 32 33 34 35 36 37 38 39 40 public class CopyFileDemo { public static void main (String[] args) throws IOException { BufferedReader br = new BufferedReader (new FileReader ("DataStreamDemo.java" )); PrintWriter pw = new PrintWriter (new FileWriter ("Copy.java" ), true ); String line = null ; while ((line = br.readLine()) != null ) { pw.println(line); } pw.close(); br.close(); } }
标准输入输出流 一、System类下面有这样的两个字段
in 标准输入流
out 标准输出流
二、三种键盘录入方式
A:main方法的args接收参数
B:System.in通过BufferedReader进行包装
BufferedReader br = new BufferedReader(new InputStreamReader(System.in));
C:Scanner
Scanner sc = new Scanner(System.in);
三、输出语句的原理和如何使用字符流输出数据
A:原理
System.out.println(“helloworld”);
PrintStream ps = System.out;
ps.println(“helloworld”);
B:把System.out用字符缓冲流包装一下使用
BufferedWriter bw = new BufferedWriter(new OutputStreamWriter(System.out));
1 2 3 4 5 6 7 8 9 10 11 12 13 14 15 16 17 18 19 20 21 22 23 24 25 public class SystemOutDemo { public static void main (String[] args) { System.out.println("helloworld" ); PrintStream ps = System.out; ps.println("helloworld" ); ps.println(); } }
1 2 3 4 5 6 7 8 9 10 11 12 13 14 15 16 17 18 19 20 21 22 23 24 25 26 27 28 29 30 31 32 33 34 35 36 37 38 39 40 41 42 43 44 45 46 47 public class SystemInDemo { public static void main (String[] args) throws IOException { BufferedReader br = new BufferedReader (new InputStreamReader (System.in)); System.out.println("请输入一个字符串:" ); String line = br.readLine(); System.out.println("你输入的字符串是:" + line); System.out.println("请输入一个整数:" ); line = br.readLine(); int i = Integer.parseInt(line); System.out.println("你输入的整数是:" + i); br.close(); } }
1 2 3 4 5 6 7 8 9 10 11 12 13 14 15 16 17 18 19 20 21 22 23 24 25 26 27 public class SystemOutDemo2 { public static void main (String[] args) throws IOException { BufferedWriter bw = new BufferedWriter (new OutputStreamWriter (System.out)); bw.write("hello" ); bw.newLine(); bw.write("world" ); bw.newLine(); bw.write("java" ); bw.newLine(); bw.flush(); bw.close(); } }
随机访问流 一、RandomAccessFile类,可以按照文件指针的位置读写数据。
RandomAccessFile类既不是InputStream类的子类,也不是OutputStream类的子类。习惯上,仍然呈RandomAccessFile类创建的对象为一个流。RandomAccessFile流的指向既可以作为源也可以作为目的地。换句话说,当想对一个文件进行读写操作时,可以创建一个指向该文件的RandomAccessFile流,这样既可以从这个流读取文件的数据,也可以通过这个流向文件写入数据。
RandomAccessFile类的两个构造方法:
RandomAccessFile(String name, String mode):参数name用来确定一个文件名,给出创建的流的源(也是流的目的地)。参数mode取”r”(只读)或”rw”(可读写),决定创建的流对文件的操作权限。
RandomAccessFile(File file, String mode):参数file是一个File对象,给出创建的流的源(也是流的目的地)。参数mode取”r”(只读)或”rw”(可读写),决定创建的流对文件的操作权限。创建对象时应捕获IOException异常。
RandomAccessFile流对文件的读写方式更为灵活。因为以下两个方法:
public void seek(long pos):设置到此文件开头测量到的文件指针偏移量,在该位置发生下一个读取或写入操作。偏移量的设置可能会超出文件末尾。偏移量的设置超出文件末尾不会改变文件的长度。只有在偏移量的设置超出文件末尾的情况下对文件进行写入才会更改其长度。 参数 : pos - 从文件开头以字节为单位测量的偏移量位置,在该位置设置文件指针。
public long getFilePointer():返回此文件中的当前偏移量。返回:到此文件开头的偏移量(以字节为单位),在该位置发生下一个读取或写入操作。
RandomAccessFile类的常用方法有:
public native long getFilePointer():获取当前流在文件中的读写位置。
public native long length():获取文件的长度。
public final byte readByte():从文件中读取一个字节。
public final double readDouble():从文件中读取一个双精度浮点值(8个字节)。
public final int readInt():从文件中读取一个int值(4个字节)。
public final String readLine():从文件中读取一个文本行。
public final String readUTF():从文件中读取一个UTF字符串。
public void seek(long pos):定位当前流在文件中的读写的位置。
public void write(byte b[]):写b.length个字节到文件。
public final void writeDouble(double v):向文件写入一个双精度浮点值。
public final void writeInt(int v):向文件写入一个int值。
public final void writeUTF(String str):写入一个UTF字符串。
二、案例:
A:写数据
B:读数据
C:获取和改变文件指针的位置
1 2 3 4 5 6 7 8 9 10 11 12 13 14 15 16 17 18 19 20 21 22 23 24 25 26 27 28 29 30 31 32 33 34 35 36 37 38 39 40 41 42 43 44 45 46 47 48 49 50 public class RandomAccessFileDemo { public static void main (String[] args) throws IOException { read(); } private static void read () throws IOException { RandomAccessFile raf = new RandomAccessFile ("raf.txt" , "rw" ); int i = raf.readInt(); System.out.println(i); System.out.println("当前文件的指针位置是:" + raf.getFilePointer()); char ch = raf.readChar(); System.out.println(ch); System.out.println("当前文件的指针位置是:" + raf.getFilePointer()); String s = raf.readUTF(); System.out.println(s); System.out.println("当前文件的指针位置是:" + raf.getFilePointer()); raf.seek(4 ); ch = raf.readChar(); System.out.println(ch); } private static void write () throws IOException { RandomAccessFile raf = new RandomAccessFile ("raf.txt" , "rw" ); raf.writeInt(100 ); raf.writeChar('a' ); raf.writeUTF("中国" ); raf.close(); } }
合并流 一、把多个输入流的数据写到一个输出流中。
二、构造方法:
A:SequenceInputStream(InputStream s1, InputStream s2)
B:SequenceInputStream(Enumeration<? extends InputStream> e)
1 2 3 4 5 6 7 8 9 10 11 12 13 14 15 16 17 18 19 20 21 22 23 24 25 26 27 28 public class SequenceInputStreamDemo { public static void main (String[] args) throws IOException { InputStream s1 = new FileInputStream ("a.txt" ); InputStream s2 = new FileInputStream ("b.txt" ); SequenceInputStream sis = new SequenceInputStream (s1, s2); BufferedOutputStream bos = new BufferedOutputStream (new FileOutputStream ("c.txt" )); byte [] bys = new byte [1024 ]; int len = 0 ; while ((len = sis.read(bys)) != -1 ) { bos.write(bys, 0 , len); } bos.close(); sis.close(); } }
1 2 3 4 5 6 7 8 9 10 11 12 13 14 15 16 17 18 19 20 21 22 23 24 25 26 27 28 29 30 31 32 33 34 35 36 37 38 39 public class SequenceInputStreamDemo2 { public static void main (String[] args) throws IOException { Vector<InputStream> v = new Vector <InputStream>(); InputStream s1 = new FileInputStream ("1.txt" ); InputStream s2 = new FileInputStream ("2.txt" ); InputStream s3 = new FileInputStream ("3.txt" ); v.add(s1); v.add(s2); v.add(s3); Enumeration<InputStream> en = v.elements(); SequenceInputStream sis = new SequenceInputStream (en); BufferedOutputStream bos = new BufferedOutputStream (new FileOutputStream ("4.txt" )); byte [] bys = new byte [1024 ]; int len = 0 ; while ((len = sis.read(bys)) != -1 ) { bos.write(bys, 0 , len); } bos.close(); sis.close(); } }
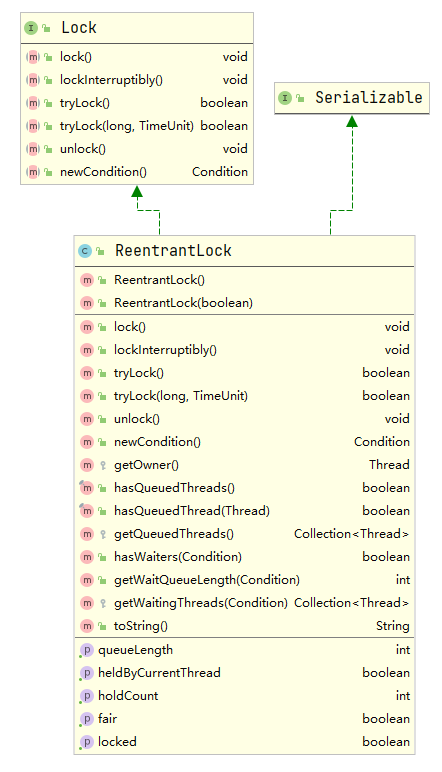
序列化流(理解) 一、可以把对象写入文本文件或者在网络中传输
二、如何实现序列化呢?
让被序列化的对象所属类实现序列化接口。
该接口是一个标记接口。没有功能需要实现。
三、注意问题:
把数据写到文件后,在去修改类会产生一个问题。
如何解决该问题呢?
在类文件中,给出一个固定的序列化id值。
而且,这样也可以解决黄色警告线问题
四、
什么时候序列化?
如何实现序列化?
什么是反序列化?
1 2 3 4 5 6 7 8 9 10 11 12 13 14 15 16 17 18 19 20 21 22 23 24 25 26 27 28 29 30 31 32 33 34 35 36 37 38 39 40 41 42 43 44 45 46 47 48 49 50 51 52 53 54 55 56 57 58 59 60 61 62 63 64 65 66 67 68 69 70 71 72 73 74 75 76 77 78 79 80 81 82 83 84 85 86 87 88 89 90 91 92 93 94 95 96 97 98 99 100 101 102 103 104 105 106 107 108 109 110 111 112 113 114 115 116 117 118 119 120 121 122 public class ObjectStreamDemo { public static void main (String[] args) throws IOException, ClassNotFoundException { read(); } private static void read () throws IOException, ClassNotFoundException { ObjectInputStream ois = new ObjectInputStream (new FileInputStream ("oos.txt" )); Object obj = ois.readObject(); ois.close(); System.out.println(obj); } private static void write () throws IOException { ObjectOutputStream oos = new ObjectOutputStream (new FileOutputStream ("oos.txt" )); Person p = new Person ("林青霞" , 27 ); oos.writeObject(p); oos.close(); } } class Person implements Serializable { private static final long serialVersionUID = -2071565876962058344L ; private String name; private transient int age; public Person () { } public Person (String name, int age) { super (); this .name = name; this .age = age; } public String getName () { return name; } public void setName (String name) { this .name = name; } public int getAge () { return age; } public void setAge (int age) { this .age = age; } @Override public String toString () { return "Person [name=" + name + ", age=" + age + "]" ; } }
Properties 一、Properties是一个集合类,Hashtable的子类
1 2 3 4 5 6 7 8 9 10 11 12 13 14 15 16 17 18 19 20 21 22 23 24 25 26 27 28 29 public class PropertiesDemo { public static void main (String[] args) { Properties prop = new Properties (); prop.put("it002" , "hello" ); prop.put("it001" , "world" ); prop.put("it003" , "java" ); Set<Object> set = prop.keySet(); for (Object key : set) { Object value = prop.get(key); System.out.println(key + "---" + value); } } }
二、特有功能
A:public Object setProperty(String key,String value):添加元素
B:public String getProperty(String key):获取元素
C:public Set<String> stringPropertyNames():获取所有键的集合
1 2 3 4 5 6 7 8 9 10 11 12 13 14 15 16 17 18 19 20 21 22 23 24 25 26 27 28 29 30 31 32 public class PropertiesDemo2 { public static void main (String[] args) { Properties prop = new Properties (); prop.setProperty("张三" , "30" ); prop.setProperty("李四" , "40" ); prop.setProperty("王五" , "50" ); Set<String> set = prop.stringPropertyNames(); for (String key : set) { String value = (String)prop.get(key); System.out.println(key + "---" + value); } } }
三、和IO流结合的方法
把键值对形式的文本文件内容加载到集合中,(把文件中的数据读取到集合中)
public void load(Reader reader)
public void load(InputStream inStream)
把集合中的数据存储到文本文件中
public void store(Writer writer,String comments)
public void store(OutputStream out,String comments)
1 2 3 4 5 6 7 8 9 10 11 12 13 14 15 16 17 18 19 20 21 22 23 24 25 26 27 28 29 30 31 32 33 34 35 36 37 38 39 40 41 42 43 44 45 public class PropertiesDemo3 { public static void main (String[] args) throws IOException { myStore(); } private static void myStore () throws IOException { Properties prop = new Properties (); prop.setProperty("林青霞" , "27" ); prop.setProperty("武鑫" , "30" ); prop.setProperty("刘晓曲" , "18" ); Writer w = new FileWriter ("name.txt" ); prop.store(w, "comments – 属性列表的描述" ); w.close(); } private static void myLoad () throws IOException { Properties prop = new Properties (); Reader r = new FileReader ("name.txt" ); prop.load(r); r.close(); System.out.println("prop:" + prop); } }
四、案例:
A:根据给定的文件判断是否有键为”lisi”的,如果有就修改其值为100
B:写一个程序实现控制猜数字小游戏程序不能玩超过5次
案例A:
1 2 3 4 5 6 7 8 9 10 11 12 13 14 15 16 17 18 19 20 21 22 23 24 25 26 27 28 29 30 31 32 33 34 public class PropertiesTest { public static void main (String[] args) throws IOException { Properties prop = new Properties (); Reader r = new FileReader ("user.txt" ); prop.load(r); r.close(); Set<String> set = prop.stringPropertyNames(); for (String key : set) { if ("lisi" .equals(key)) { prop.setProperty(key, "100" ); break ; } } Writer w = new FileWriter ("user.txt" ); prop.store(w, null ); w.close(); } }
案例B:
1 2 3 4 5 6 7 8 9 10 11 12 13 14 15 16 17 18 19 20 21 22 23 24 25 26 27 28 29 30 31 32 33 34 35 36 37 38 39 40 41 42 43 44 45 46 47 48 49 50 51 52 53 54 55 56 57 58 59 60 61 62 63 64 65 66 67 68 69 70 71 public class PropertiesTest2 { public static void main (String[] args) throws IOException { Properties prop = new Properties (); Reader r = new FileReader ("count.txt" ); prop.load(r); r.close(); String value = prop.getProperty("count" ); int number = Integer.parseInt(value); if (number > 5 ) { System.out.println("游戏试玩已结束,请付费。" ); System.exit(0 ); } else { number++; prop.setProperty("count" , String.valueOf(number)); Writer w = new FileWriter ("count.txt" ); prop.store(w, null ); w.close(); GuessNumber.start(); } } } class GuessNumber { private GuessNumber () { } public static void start () { int number = (int ) (Math.random() * 100 ) + 1 ; int count = 0 ; while (true ) { Scanner sc = new Scanner (System.in); System.out.println("请输入数据(1-100):" ); int guessNumber = sc.nextInt(); count++; if (guessNumber > number) { System.out.println("你猜的数据" + guessNumber + "大了" ); } else if (guessNumber < number) { System.out.println("你猜的数据" + guessNumber + "小了" ); } else { System.out.println("恭喜你," + count + "次就猜中了" ); break ; } } } }
NIO 一、JDK4出现NIO。
新IO和传统的IO有相同的目的,都是用于进行输入输出的,但新IO使用了不同的方式来处理输入输出,采用内存映射文件的方式,将文件或者文件的一段区域映射到内存中,就可以像访问内存一样的来访问文件了,这种方式效率比旧IO要高很多,但是目前好多地方我们看到的还是旧IO的引用。
JDK4新IO要了解的类(看API)
Buffer(缓冲),Channer(通道)
二、JDK7的NIO的使用
Path:与平台无关的路径。
Paths:包含了返回Path的静态方法。
public static Path get(URI uri):根据给定的URI来确定文件路径。
Files:操作文件的工具类。提供了大量的方法,简单了解如下方法
public static long copy(Path source, OutputStream out) :复制文件
public static Path write(Path path, Iterable<? extends CharSequence> lines, Charset cs, OpenOption… options):把集合的数据写到文件。
1 2 3 4 5 6 7 8 9 10 11 12 13 14 public class NIODemo { public static void main (String[] args) throws IOException { Files.copy(Paths.get("a.txt" ), new FileOutputStream ("Copy.txt" )); ArrayList<String> array = new ArrayList <String>(); array.add("hello" ); array.add("world" ); array.add("java" ); Files.write(Paths.get("array.txt" ), array, Charset.forName("GBK" )); } }